Hammer A3-26 Review
This is an amateur woodworker’s detailed review of the Hammer A3-26 Planer-thicknesser. I usually try to keep my posts much shorter than this, but in purchasing this machine, I wasn’t able to find a lot of commentary or discussion about it online, so I’m hoping the length of this review will be forgivable. This is written from the perspective of upgrading from a 6″ King Canada KC-150C jointer (a typical Asian import machine) and a 12 1/2″ DeWalt 734 portable thickness planer.
I’ve opened the comments section on this post to allow questions and will make an effort to answer any that would add useful information to this review.
The A3-26 is Hammer’s smallest jointer-planer, with a 260mm width capacity, which is just slightly over 10″. In jointer mode, the bed length is 1120mm (approximately 44 1/8″). It has a 2.6 HP induction motor. It is available with a three knife quick-change cutter head or Hammer’s new Silent Power carbide spiral cutter head. I selected the three knife quick-change cutter head, as the Silent Power cutter head would have added approximately 30% to the total cost of the machine at the time of my purchase.
This review is based on my initial experiences with setting up and testing the machine, and using it for a couple of weeks. I will post a follow-up review later on with additional thoughts.
As I went through the purchasing process with Felder Group Ontario, the sales representative made it completely clear to me that it was their goal to compete based on quality and service rather than price. There is definitely a premium charged on these machines when comparing them against Asian-made machinery of similar capacities. Consequently, my expectations are much higher for this machine than for the Asian-made machines it is replacing.
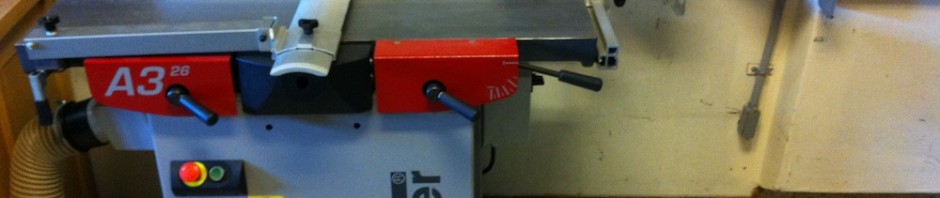
Setup Process

The one cosmetic imperfection – I couldn’t quite catch the right light
The machine was delivered locally by the Felder Group Ontario service team, and they gave me a very helpful tour of the machine after they dropped it off. Mine arrived without a pallet, and with the surface protection paper already removed. The fit and finish is generally very good, but there is a shallow scratch on the outfeed jointer bed near the cutter head. The scratch is entirely cosmetic, so I didn’t bother raising the issue. Cleaning it up for use was pretty easy – I used some paint thinner and several pieces of paper towel to wipe down the working surfaces of the light coat of oil from shipping and then I sprayed on some non-contaminating rust inhibitor. No big globs of goop here.
This machine is suitable for hard-wired and plugged installations, and includes a disconnect switch on the back of the machine, but it ships with a uselessly short cord and without a plug installed. Electrical connection is left as an exercise for the owner. Replacing the cord with something useful is more or less required by design, but I was quite amused to find a note in the instruction manual that opening the switch box without permission from Felder voids your warranty. I made sure to email them for “permission” before proceeding, despite feeling a bit silly doing so. Changing the cord was very straight forward with the provided wiring diagrams. If you’re not absolutely comfortable reading a wiring diagram and doing this, you really should get an electrician to set it up for you.
Footprint

Glorious floor space! 24″x24″ of pure gold!

Viewed overhead from a ladder, the footprint of this machine really closely matches its predecessor.

I won’t be able to stack things behind the new one, but I really don’t see that as a loss.
I purchased this machine because I have a pretty tight space, but I wanted a wider jointer and a quieter planer. There are pros and cons to a machine like this, but first and foremost, this eliminates the need for a separate planer, which frees up a good amount space for me to add another machine in the future. Space is the single most critical factor in this purchase for me. Quite honestly, if I had just 20 square feet more to spare, I’d have gone for the larger A3-31 without question. The A3-31 doesn’t take up 20 extra square feet, but it’s a little larger and I felt that I’d have difficulty moving it and everything else around it.
Side by side, this machine takes up the same space as my old 6″ jointer, but packs all the punch of a much more capable machine. So this machine’s capacity and performance per square foot is really what made the sale, and it definitely lives up to expectations.
My old planer was mounted on a flip-top tool cart that I built. This purchase has freed up a spot on this cart. I am currently weighing the value of having a miter saw in my shop at all (it has been sitting in my basement as part of my “ongoing” renovation project for over a year now and I can’t say I’ve missed it all that much). So in terms of footprint, I’ve either recovered a space for a small machine like a mortiser or oscillating spindle sander on the flip cart, or I’ve eliminated the need for the flip cart all together. Mission accomplished.
Edge Jointing and the Fence
The fence on this machine is an aluminum extrusion mounted on a bracket fabricated from steel tube and sheet steel. In some ways, it reminds me of a Biesmeyer table saw fence with a screw knob in place of the cam lever. It is fastened at two points to steel brackets that allow adjusting the angle of the fence from 90 degrees to 45 degrees away from the operator. Loosening the angle adjustment is quite easy, and can be accomplished with one hand holding a bevel gauge against the fence and the other hand on the locking lever. There are positive stops for both extremes. Both were very slightly off on arrival, but correcting them was intuitive and took less than 10 minutes.
The fact that this fence is aluminum will likely raise questions for North American buyers used to heavy cast iron fences, even on low end machines. It seems that opinions about fences vary greatly by continent. Is the fence adequate? Yes. Is it a sturdy as cast iron? No. I can wiggle this fence if I choose to. Using appropriate feeding technique, it stays in place just fine. In use so far, this has not impacted the quality or accuracy of the cut, but time will tell. The aluminum fence is considerably flatter and straighter than the cast iron on the old 6″ jointer. One trivial drawback to the fence itself is that my magnetic Tilt Box angle finder doesn’t grab on to the aluminum face.
The biggest advantage to this design is space. By a wide margin. A typical centre-mounted North American style fence takes up a considerable amount of space behind the machine for the bar that allows the fence to come across the table. The rear mounting bracket for this fence protrudes about 7 1/2″ off the back of the machine, functioning both as a blade guard for behind the fence and a secondary attachment point to reduce wiggle in the fence. The sales representative said this was done in response to feedback from North American users that want to be able to grab their fences and not be able to move them. For those interested, the second point of attachment made considerably less difference to stability on on the A3-26 than it does to the larger A3-31, presumably because the A3-26’s fence is shorter and provides less leverage for deflection.
I do have one problem with the fence design, however. The aluminum fence mounting rail extrusion on the end of the jointer infeed wing is too short. The extrusion and clamping mechanism has a taper that pulls the fence into a consistent alignment when the clamp is fully engaged on the extrusion. As long as it’s fully engaged, this works great. But when positioning the fence at the full face jointing capacity of the machine, the clamp overhangs the end of the extrusion by a little more than 2″, which prevents the taper from engaging completely and doing its job.  If I don’t tighten the knob just right, this causes the fence to tip out of square when tightening it down at its maximum extent. It’s really only a matter of time before I thoughtlessly end up with an out of square cut as a result of this. Even if I am careful, the fence is skewed to the right along the length of the table. That extrusion really needs to be just 2″ longer to support the fence properly across its entire travel, and I see that as a pretty serious design oversight in a machine that is competing on quality rather than price.
As long as the fence mounting clamp is not overhanging the end of the extrusion, it has consistently set and held the fence square, and is very quick and easy to adjust.
Over all, the fence does its job, and I think it’s going to do an excellent job as long as I remember to keep an eye on squareness and remember to keep an appropriate amount of pressure on the piece when edge jointing.

Within the fully supported range of motion, the fence is reliable and consistent

This is what happens if I’m not careful at the maximum extent of the fences travel. That is a 2mm gap at the top.

This is how the fence attaches when set for the maximum 10″ face jointing capacity of the machine.

(click to enlarge) At the maximum extent, the fence skews to the right about 3/8″.
Face Jointing
I’ve gained 4″ of jointing width, which is a huge plus for me. Most of the lumber I buy is 6-8″ wide. Getting good quality wider stock around Toronto is very, very easy (if you don’t mind paying for it), and when it comes down to it, wider boards are more attractive when used for things like side panels and table tops. So those extra 4″ are going to make it drastically less likely to resort to surfacing and thickness planing with my router, which is very messy and very slow.
The user manual recommends against jointing pieces longer than 1.5M without extension tables (optional accessories available from Felder) or at least a helper. So I took a piece of 10″ wide, 6/4″ black walnut 6′ long and gave it a go. That is about as big a piece as I’d try on my own and it was really quite difficult to control. 6′ is about 1.8M. I’m not really all that strong, so others may be able to manage better. The result was good, but maintaining proper technique was difficult because of the leverage and weight involved. I will at some point definitely be adding table extensions for longer pieces.
Realistically speaking, the vast majority of the parts I make are 4′ or shorter, and my shop is designed around the idea of processing that length without having to move machines around much. In order to joint anything longer than 6′ long, I need to re-arrange the entire shop to make in-feed and out-feed space. So the capacity of the A3-26 is quite reasonable considering my projects and my general space limits, and I’m sure anybody looking at the smaller machine will be in a similar position.

the jointer depth of cut adjustment
The depth of cut adjustment lever on the infeed side has just the right amount of friction to avoid accidental adjustment and make it easy enough to make smooth adjustments. Furthermore, it’s accessible and convenient enough that I’m quickly adopting a new habit of actually using the depth adjustment to distinguish between rough and finish cuts, thus making better use of my time. I never adjusted this on my old 6″ jointer because its capacity was limited by a small motor and adjusting it was less convenient than making multiple passes.
The scale on the depth of cut adjustment for the jointer really only seems to be marked for rough estimation of the depth of cut. There are 8 graduations, which I presume are millimetre and half millimetres up to the full 4mm cutting capacity of the machine, but it’s not set up in a way that makes it very easy to read. I don’t hold this against the machine though because really, jointing isn’t about a precise depth of cut unless you’re cutting a rebate, which this machine can’t do.
The European style cutter guard is a little different from a pork-chop guard, but now that I’ve tried it, I like it a lot. I used to be in the very bad habit of passing my hands over the cutter head on top of the board when face jointing, and this design simply doesn’t let me do that. This design acts as a constant reminder that that is a dumb thing to do. Even better, for those times when the cutter guard doesn’t work (it has a 75mm maximum height, which is just shy of 3″), it has a quick release that lets you swing it right out of the way.
The quality of the cut I get when face and edge jointing is very good with these brand new straight knives. Time will tell how well they hold up. Deep cuts naturally result in tear-out, but adjusting the depth of cut to suit the task is completely painless. The maximum depth of cut is 4mm, or about 5/32″. I really don’t see myself maxing it out very often, but I’m pretty comfortable taking 2mm cuts for roughing. The manual recommends 1mm for smoothing, which gives very nice clean cuts.
Thickness Planing

Ready for planing
Planing with this machine is an absolute joy compared to the eardrum piercing, screamingly loud racket of the universal motor in my old DW734. The induction motor really makes a lot of difference, both in terms of noise and power. The A3-26 has a maximum cutting depth of 4mm. On the DW734, the maximum cutting depth was 1/8″, but what DeWalt wasn’t so clear about in their marketing material was that it couldn’t handle 1/8″ across the full 12″ cutting width the machine advertised – it had a guard that limited the depth of cut to 1/16th of an inch for all but the centre 6″ of the machine. When Felder says 4mm, they really mean you can cut 4mm.

This little tear out on walnut with wavy grain is quite acceptable. This piece is 2″ wide
When taking maximum capacity cuts in hard wood, I have definitely encountered tear out. The user manual recommends limiting cut depth to about 1mm for the final surface. I planed some very tricky figured walnut with it for my current project. Figured walnut is a bit of a torture test for a jointer or planer, so this isn’t even slightly surprising. On light cuts (about 0.5mm) and applying none of the various techniques to reduce tear out, there was light the tear out that I shouldn’t have difficulty cleaning up. For a slightly more realistic test, I tried some hard maple with better behaved grain.  Again with heavy roughing passes, there was tear out. For finishing passes at the recommended 1mm or less cutting depth, it cut beautiful glimmering surfaces with only slight scalloping typical of all good quality machines that is quick to sand out for a finished surface. If you click to enlarge and look really closely, you can just make out the scalloping on the walnut.
The column has a locking clamp which can be engaged to reduce snipe. With the locking clamp not engaged, snipe was clearly visible on the planed surface for the last 2-3″ of the board. With the clamp engaged, it disappeared completely. This is a big improvement over the machine it replaced. Locking the clamp down sufficiently seems to be about a full turn on the locking lever. Snug, but not a death grip.
I’ve lost 2″ of planing capacity by going with this machine. So far, I don’t miss it. I gave a lot of thought to this before committing to the A3-26. With a 10″ jointing and planing capacity, I can book-match panels up to just a little shy of 20″ wide, and I can slip match 3 boards for just a little shy of 30″. Provided I take care to use biscuits or splines to align the joint, these panels will look great and I’ll never miss those two inches, because the jointer imposes the more relevant limit on my capacity for processing solid rough lumber, and as far as that’s concerned, I gained 4″.

The feed roller engagement lever on the bottom left; the column lock on the bottom right, and the table height hand wheel on top with the height scale.
The scale on the planer is graduated in millimetres and 1/8ths of an inch. I find that kind of unfortunate and would have liked at least 1/16ths on the imperial graduations, so I’m using that scale only for roughing. Hammer offers a reputedly very precise “digital” hand wheel which I didn’t buy. By combining my cheap digital calipers with a little bit of math and the fact that each turn of the hand wheel is 2mm, I’ve achieved fairly precise results. I think I’m going to give in to impulse and upgrade to a more convenient method eventually.
Dust Collection

The dust collection performs about the same as my old lunchbox planer did – a few curly shavings are left behind
Dust collection seems to be about the same as my previous equipment, which perhaps says more about my dust collector than the gear itself. A few shavings escape each time I use the machine, both in jointing and planing modes. The user manual specifies the dust collection requirements fairly precisely and it seems fairly likely that my system doesn’t meet that spec.
Changeover
Change-over time is an inevitable fact of life in a tiny shop. Even with my old setup, I had to pull the jointer off the wall, set up my dust collector blast gates, joint, then return the jointer to the wall, pull out the planer, switch the dust collector over to the planer, plane the boards, then put back the planer. Add to this the fact that the planer was on a flip stand that required me to flip it over about half the times I used it, and really, the old changeover process added up.

These nice heavy springs handle most of the weight of the jointer tables
The new changeover process is roughly the same in terms of time, although the steps are slightly different. To change over from jointer to planer, you move the fence to the front, unlock the table, lift it up, disconnect the dust hose, flip the dust shroud over, reconnect the dust hose, then crank up the table and engage the feed rollers. Going back to jointer mode, you reverse all of those steps. The jointer tables lift up together with a carefully balanced assist spring that makes raising and lowering the heavy cast iron really easy and also makes banging it down hard impossible. The springs make locking the tables down again a two-hand operation, because you need to push the table down and then push the locking lever in to engage it.
I’m sure everyone wonders about the cranking. Each full turn of the hand wheel is 2mm. In order to flip the dust shroud from planing to jointing mode, you need the table to be at 170mm.  If you have the table setup at 3/4″, which is approximately 18mm, then you need to crank it down 152mm, or 76 revolutions. Each individual revolution feels effortless (as long as you don’t have the column locked!), but it’s still a bunch of cranking. If someone can invent a good quick release planer bed (like a quick release vise), it will likely be a hot commodity, but I see the cranking as a small necessary evil considering the benefits of a combination machine.
On the whole, the changeover takes about the same amount of time that changing over from jointing to planing and vise versa always took for me with two separate machines in my small space. So changeover is totally a non-issue for me.
One small quibble about changeover though: the user manual doesn’t mention engaging or disengaging the planer drive rollers in the sections about changing over between jointing and planing. It’s only mentioned and explained once in the beginning of the manual where they show the control layout, and it’s not mentioned again in the appropriate contexts where it should be used. It’s very easy to miss. So easy, in fact, that the Felder service technicians who delivered the machine to me made a point of mentioning it to me. Failing to disengage the clutch when changing over gradually wears out the internal mechanisms, and I was told that while it’s not a huge deal to replace these parts, it’s easily avoidable.
Motor
The A3-26 has a smaller motor than the other A3 series machines. So far, I actually see this as a benefit, because it happened to run on the 20A, 220V circuit I already have for my lathe. The larger 4HP motor on the A3-31 would have required more electrical work that I didn’t feel like doing. I took some 3mm full width cuts in walnut to see how the motor would respond, and it kept up quite nicely without me having to hold back on the feed rate.
Starting this machine has a few extra steps compared to the machines it’s replacing. First, you have to unlock the off-switch by twisting it until it pops out, then you push the starter button and hold it until the machine reaches full speed. This works more or less just like my clothes dryer. It’s no bother at all, it’s just different. I like the safety interlock on the off-switch too, but it lead to a few moments of tension during my setup process as I forgot to unlock it and wondered why the machine wouldn’t start.
Vibration
The weight of the machine is quite impressive, and also quite effective at dampening vibrations. I am unable to perform a nickel test on it because my floor isn’t quite level enough for it to be a useful test, but I’m quite confident it would pass with flying colours.
Noise
When running idle, this machine is drastically quieter than my old DeWalt 734 planer, which is good, but it’s very slightly noisier than my old 6″ jointer. I’m guessing the increase in noise compared to the 6″ jointer is due to the length of the knives. When taking a cut, the noise of the cut is mostly dependent on the width of the stock and depth of cut, so it’s not terribly fair to compare this machine against the old, because it’s capable of much heavier cutting than the old machines were. Over all, this is a significant improvement, because what took 5-6 passes with the old DeWalt planer can be accomplished in 2 or 3 quite comfortably with this, so in addition to being quieter, it won’t go on for nearly as long. I was previously in the habit of resawing boards to remove anything greater than 1/8 prior to thickness planing to reduce my noise output. My neighbours and I will likely be pleased with this characteristic of the machine.
Update: I discovered that the airflow from dust collection drastically increases the noise of the machine. When I started it with my dust collector turned off, it was at least a 50% reduction of the noise. I’m going to look in to this further and see if I can tweak something to reduce this while the dust collector is running.
Bottom Line
I’m quite happy with this machine. If I was making the purchase over again, I’d perhaps give a little more serious thought to the Silent Power cutter head, not because this excellent machine really needs the upgrade, but more because of the improved performance and claims of a further 50% noise reduction that it offers.
The issue with the fence mounting rail being short and not seating properly on its own when the fence clamp overhangs the rail is a minor annoyance on an otherwise very well thought out and designed machine. In fairness, when edge jointing, you don’t really need the fence to be all the way out at its maximum extent, and an argument can definitely be made that it’s easier to reach if you bring the fence forward for edge jointing. So it’s definitely not a deal breaker, but I can’t totally forgive this oversight given the premium price tag on these machines.
This machine has impressed me, and I’ll be giving Hammer’s other offerings a serious look in the future.
Comments: 9
Hi, nice review, however I have an A3-31 and they only require a 20 ampere circuit….Rod.
Hi Rod, thanks for the info. The techs at Felder Group Ontario told me 30A for the A3-31 and 20A for the A3-26. Looking closer at the nameplate on the cabinet, mine says 11.3A so I wonder now why they told me that. The paperwork I received said not more than 20A, which happened to be what I have, so I didn’t question it beyond that. I guess anyone for whom this is a sticking point might want to confirm with them rather than take my (non-expert) word for it.
Nice review; just ordered mine and based on your feedback is seems the right choice for me. The only downside: delivery time is 10 weeks… :-(((. regards, Erik
Great review! You answered many of the questions I have been struggling with for the past few months. I have a Hammer K3 and love it, but having a tough time justifying $4,000 for the A31-26 with the silent power. I have neighbors near and noise is a primary issue. Your last commenT regarding dust collection adding to the noise level is exactly what I feared with the straight knives. You may have pushed me. I probably will be happier. Thanks
I have one question for you. I have not made a decision to go with the Hammer yet due my consideration of the Grizzly 12″ combo machine. I love the fact that the indeed and out feed tables on the Hammer lift as one and the fence stays attached to the machine. In addition, having experienced the quality and precision of the K3, I find it difficult not to desire their J/P. however, at $2,400 Grizzly offers 12″ capacity and a helical cutter head. Did you consider the Grizzly J/P combo?
Hi Dominic, yes, the Grizzly was on my short list. They have a good reputation on the forums and their price is attractive. Adding taxes and international UPS brokerage fees and shipping eroded the price advantage a bit. In the end, it came down to service availability and the fact that I could visit a showroom and see how well built they are. The service advantage is significant. First, the machine was delivered by their technical service team. When I had questions, they came out and visited me to evaluate my problem, and they really went the extra mile to sort it out. I do sometimes wish I had bought the silent power cutter block. Nothing wrong with the straight knives – just if I were doing it again I’d get the carbide. And I’m not missing the 2″.
Thanks. I can’t tell you how good it was to read a review of the A26. Everyone gravitates to the 12″ machine, but the cost is prohibitive based on what I do. I am a serious hobbyist (some commission work) and rarely work boards wider than 10″. Length should not be a problem, longest piece I’ve run through a jointer is 52″. Thanks again for the fine review.
An excellent summary of this tool!
I own an A3-41 (16″ version) with a factory-installed Byrd head. It’s been in use since April 2012 (20 wk delivery…ouch!). I’ve been very happy with its performance. I chose this particular head for 2 reasons: (1) it’s a lot quieter than straight knifes & (2) it’s a true shear cut that minimizes the chance of tearout on challenging grain. To put the cutter to the test, I’ve run maple, beech & walnut deliberately backwards through the planer (no tearout). Also did this on the jointer taking a max depth cut. Again, no tearout. Felder USA installed the Byrd head once the tool arrived in Delaware. This avoided the headache of having to install it myself. The installation was at no extra cost other than the cost of the head itself. This option wasn’t publicized by Felder, you had to know to ask. I only learned about it based on a woodworker’s posting last year (many thanks for the lead!). This option is what closed the tool purchase decision for me.
Must Haves
(1) Accuracy (alignment, table flatness, etc) – can be a challenge when planer tables lift
(2) Excellent cutting – tool required to have Byrd head
(3) Capacity – often need 12+” planer capability
(4) Space – 2 tools in 1 footprint a big plus
I put off this tool purchase for 2 yrs because I couldn’t find anything that met all my requirements. The redesign of the Hammer tool in 2011 got rid of the butterfly hinge on the infeed table. This was the main show stopper (according to reviews, alignment suffered with joint wear). After learning they’d install a Byrd head, I knew I’d found the right tool.
A comment about the choice of spiral cutter head. Be very specific which one you’re getting. They are not all the same cutting geometry. A helical/spiral head does not automatically equal a shear cut. When I ordered my tool, Felder had not yet released their version of a spiral cutter head. Their marketing literature claims that it produces a shear cut, but this isn’t the case. A shear cut is a single point of contact across the width of the board. Take a look at the tooth geometry for both of these spiral cutter blocks (Felder spiral silent power vs Byrd Shelix). The Felder spiral cuts straight downwards for the full width of the chicklet all at the same time. It’s simply a shorter cutting width than the straight knife. The teeth on the Byrd head are crowned & angled so that they cut sideways across the work piece…there is only 1 point of contact in the cross direction. It’s the same idea as skewing a hand plane to get through difficult grain. In researching this tool & specifically the Byrd head, I had looked at every combo tools on the market that had spiral head options (ex: Grizzly). While they had helical heads, they were not shear cuts. Only the Byrd head did this. I think Powermatic was the only manufacturer that specifically says they’re using a Byrd head.
I have an extension table & a 2nd mounting bar so that it can be used either with joiner infeed or planer outfeed (this is where it usually lives). It was tedious to get it aligned properly, but has been well worth it.
On my tool, the fence squareness requires that the fence base is fully resting on the table. There are plastic feet that support the weight of the fence. When these feet aren’t on the table, then it’s way off of square. From a practical standpoint, I tend to square an edge with the fence more towards the operator side. With 16”, it’s simply too far back to comfortably reach the full width of the tool. This means that the front part of the tool gets more blade ware, but that’s not really an issue when using small inserts. Just index over the ones getting use as needed.
[…] have a Hammer A3-26 jointer-planer, and it’s a great, compact machine (I reviewed it shortly after getting it). It can joint and plane wood up to 10″ wide, but packing a […]
Comments are closed.