JessEm Rout-R-Lift II Review
I bought this router lift in February, and now, having used it for about five months, I’ve formed some opinions I wanted to share as a hobbyist and ordinary user. Â This is my first router lift. I’ve long thought them to be a pricey luxury that would not be worth the approximately $300 (plus table, plus router, etc…) they seemed to cost. When JessEm introduced this low cost lift coincidentally with the cast iron table saw extension wing I wrote about before, I couldn’t resist. Â I bought them at the same time.

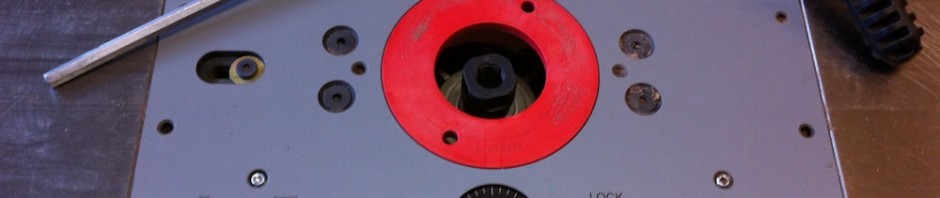
Installed and ready to use
This is a lighter duty lift designed specifically for 2HP routers. It is available in a few different variations to fit different routers. According to the product description at Lee Valley, it uses a phenolic plate and “lighter construction” to achieve the lower price, yet it’s still made in Canada. How often to you see north American made products competing on price these days?
The bottom line is I am quite pleased with this thing. Â I would buy it again in a second without regret.

The under-side of the lift
My opinion that a router lift is a luxury stands. However, at this price point, it’s well within reach, and really, as a hobbyist, practically all of my tools are luxuries to me anyway. Â The Hitachi M12VC router I have mounted in it has found its permanent home. I’ve used this setup for routing raised panels (using a vertical panel raising bit), grooves, dadoes, tenons and rebates.
The initial setup was really quite simple. It took no more than 45 minutes, and that was mostly because I fussed a bit with getting the plate perfectly level with the table surface. First, I mounted the router according to the instructions using an Allen key to secure the router to the carriage, then I dropped the plate into the hole on my table and used a smaller Allen key to carefully raise and lower the plate to line up the edges. I used a block of hard maple with nice sharp square corners and slid the block over the gap between the plate and the table in every direction to see if it would catch. There are 10 grub screws on this plate to level it, and being phenolic, it seems to deflect very slightly as you level it if one

The under-side of the carriage, showing the router mounting clamp
screw is exerting more pressure than adjacent screws. However, I set it once when I installed it, it has required no adjustments since. Since the plate hardly ever needs to come out of the table (I took it out for only the second time to photograph it for this review), so it’s fair to call this a minor one-time hassle. I also placed my 24″ aluminum straight edge over the plate and saw no light from any angle, so I’m satisfied that with the levelling screws all carefully aligned, it’s quite flat and stable.
The real magic of having a router lift has been how easy it is to perform very accurate height setups.  I stop short of getting out the dial indicator, but I did make a point of carefully measuring the result of a real cut. I needed a 1/4″ deep 1/4″ wide groove for a frame and panel rail. I zeroed the depth of cut by placing a board over the bit and raising it under the board slowly until the bit touched the board.  JessEm claims that each full turn of the crank raises or lowers the carriage 1/16″, so I turned the crank twice, ran the cut, then turned it two more times to complete the cut. The end result was 0.256″ deep according to my cheap digital calipers. Given my lax zeroing procedure, it seems entirely likely that the 0.006″ was simply the result of inaccurate zeroing. Either way, 0.006″ is a very good level of accuracy for hand feeding pieces of wood. I’m quite sure that I could do better if I tried, but what’s really impressive about this is that I spent zero time fiddling with it. I literally cranked twice, ran one test cut and went with it.

From above the table, with the router raised for bit installation
Installing bits is also considerably improved over my old router table setup. Previously, I had to twist the motor out of the fixed-base router base that was affixed to the bottom of my router table, which was always awkward and resulted in twisted up wires. I frequently used to bang the bits off of things in the process, which always bugged me (but probably did no harm). With the lift, I simply crank the router motor up to the top and use my wrenches above the table. This particular router would occasionally get knocked over as I was doing this on my bench top. With no twisting and the lift holding the motor solidly, changing and removing router bits is vastly easier now.
A sales representative from a competitor at the time tried to tell me that his company tested this lift and found that its lighter two-post construction lead to chatter in the cut and play in the router mount. In retrospect I’m kind of insulted he thought I’d believe that, and quite frankly, it lowered my opinion of that company. This lift has been solid in my use, and has performed flawlessly for every task I’ve thrown at it. In fairness, I do not use large diameter bits and I suppose if you’re taking aggressive cuts with those bits, you may find limits I haven’t hit yet. I generally don’t try to remove a total cross-section of more than about 1/4″ by 1/2″ in a single pass. These are limitations that I think are reasonable for the 2HP router class this lift targets.
If I had to pick one thing in the interest of providing a “con” to this product, it would be the amount of cranking it requires. The user manual actually goes as far as to say that cranking the lift using a power drill would prematurely wear the mechanism and void the warranty. At first, I thought “wow that’s an odd thing to say in the manual”. Now, I understand. At 16 turns per inch, if you have just a 2″ long router bit installed, the length of the cutter alone will require 32 turns to zero out. That’s not counting the inch or so to get your collet under the table if you raise it all the way up.
Really, the amount of cranking I’m doing is the one and only thing I’ve conceded to this tool – in trade, it has given me a great deal of accuracy and convenience. It really is a luxury, but it is a luxury that has been worth the price to me.
Comments: 7
I’m curious to see how you’ve done a couple of things as I’m just about to embark on the same project here.
1. Did you include a safety switch for the router motor, and if so, what did you buy and where and how did you mount it? And,
2. Have you finished the router table fence yet? What did you end up building and how are you securing it to the table?
I have my own ideas of what I’ll do here, but it would be interesting to see what you did.
Hi Dave,
1) No, I just plug it in and use the switch on the router itself. I have never bothered to get a safety switch, although having a switch that is easier to find to turn it off would be a great idea. I’m thinking I’ll add one whenever I get around to adding a dust collection enclosure for underneath the table. My table saw wing has a mounting flange and tapped holes for an accessory dust collection box that General International sells separately, and it’d make a good point on which to mount a secondary switch.
2) I adapted a fence I had from my previous router table. It’s a pretty typical split fence design with a vacuum hose adapter something like this (but not exactly): http://www.busybeetools.com/products/DUST-HOOD-2-1%7B47%7D2IN.-FOR-ROUTER-TABLE.html. The extruded aluminum fence on the Ridgid TS3650 has a T-slot running down the centre of its face, so I mount it to the table saw fence with T-bolts and hook up the hose. I’ll snap some pictures of this setup and post them when I get a chance.
Derek
I have a switch on order that has two outlets in it, one for the router motor and one for the vacuum… so when you fire it up it’ll turn both on and off at the same time.
I spent time with SketchUp today designing what I think may be pretty close to what I’ll build. Have a look and feel free to leave a comment, suggestions, or critique. I’m open to them all… anything to improve it is what I’m after. You can find it here: http://youtu.be/HjRmoZeLJe0
My fence design video is actually here: http://www.youtube.com/watch?feature=player_embedded&v=qb8ZO4LoEhk as I took the original one off when I revised it. My system is now fully installed and I’ll send you a blog link when I get it written up. And now that it’s all installed I have modified the base section of the fence design slightly too, so by the time it’s built it will be a little different than the video.
Everything on my end came out really well. Thanks again for giving me the idea for this, Derek! It’s a great improvement in the shop!
Dave.
Thought I’d share the final router safety switch mount I fabricated. The TS3650 makes mounting accessories along the fence easy with that running slot! :)
http://2020heinsite.blogspot.com/2013/02/router-switch-done.html
Dave.
[…] for more information about the router wing itself, and I also have an article about the low-priced Jess-Em Rout-R-Lift II router lift that I use in […]
[…] of the time, when I use my cast iron router wing and my router lift, I use it for work at the edge of a board, and the dust port on my fence works fine. Â It always […]
Comments are closed.