Installing a Cast Iron Router Wing in my Ridgid TS3650
General International offers these cast iron router tables that happen to also fit as table saw wings. Their website doesn’t really have much/any info about it as I write this – it’s linked as an accessory to a router table package. When I was at the Hamilton Woodworking Show back in January, I saw one set up on a sheet metal stand and noticed the holes drilled through the back of the casting. Interestingly, the packaging doesn’t refer to itself as a table saw wing at all. BUT … the dimensions were 16″x27″x1 1/2″, which is theoretically a perfect match for my saw, so I ordered one. Furthermore, there were no instructions included with mine, nor was there any mention of a “table saw” any where in, on or near the box. The sales reps I spoke to at the show did confirm my suspicion that that it was intended for table saw use though.
 Taking it out of the box, I measured the hole spacing and checked out where the bolts are positioned on my TS3650’s wing. It looks to me like they drilled the casting to be compatible with a few different saws, and there were 4 holes that matched the spacing I needed. The holes leave plenty of room for adjustment – so much so that I needed to go get some new bolts and washers. The existing wing was a slightly lighter casting, so the original bolts were a little short.
Along the outside edge, there is a mitre slot and a slot for T-bolts that will be handy for affixing feather boards (if I ever come around to using them). The mitre slot happens to fit my OEM Ridgid mitre gauge perfectly with no slop at all, so I’m pleased about that. There’s no provision for attaching a fence, so I plan on building a new fence to attach to my table saw fence based on the New Yankee Workshop‘s design. On the under side of the casting, there are tapped holes for mounting bolts for the sheet metal stand and for a dust collection enclosure that fits around the lift and router. I plan to build or buy such a dust collection enclosure at some point. It was quite reasonably priced at the show compared to building a comparable solution.
 My first step was removing the old wing. Since I was working alone, I decided to rig something up to help support the weight as I un-bolted it from the side of the top. I had some pieces of angle iron sitting in the corner at a convenient length, so I clamped them across the table to both wings of the saw. 4 clamps on the side I was removing and 2 on the side I was keeping.
 I had to remove the plastic end-caps from the extruded aluminum fence rails and loosen a bolt between the wing and each fence rail. Just to be safe, I also loosened the power switch box and slid it out of harms way toward the centre of the front rail. With the old wing’s bolts removed, I slid it out from between the rails like a drawer and then took off the angle irons and clamps.
With the old wing removed, I clamped the angle irons to the new wing through the router insert opening with heavy paper between the angle iron and the new wing. The clamps and angle irons I used added considerably to the weight so I’d recommend using lighter clamps and 2x2s if you do this – I’d guess the total weight was about 80 pounds. I didn’t get any pictures of lifting the new wing into place or bolting it on, as I had my hands quite full with that. I aligned the top edges of the wing and the table saw top, using my finger as a gauge and tapping gently with a wooden mallet to make fine adjustments. I didn’t quite get that perfect unfortunately, so I’ll have to go back, loosen it off, and give it a few more taps at some point.
I was careful to align the back edge of the wing against the rear fence rail. This put all of the difference in the wing’s length at the front of the saw. By putting all of the difference  along the front, I avoided having to shim on both sides. I used my digital calipers to measure how far the front of the wing casting stood proud of the centre section of the table saw and stacked stainless steel shim stock to sit between the front fence rail and the table top. It came out to be about 0.020″ worth of shimming. In retrospect, I probably should have put the error along the rear rail instead of the front but it seems to work OK. After re-installing the front fence rail, I discovered that I needed to drill a hole through the wing casting to accept the fence rail mounting bolt. Drilling cast iron is easy – lubricate and drill with 2-3 progressively larger drills to reach your desired size.
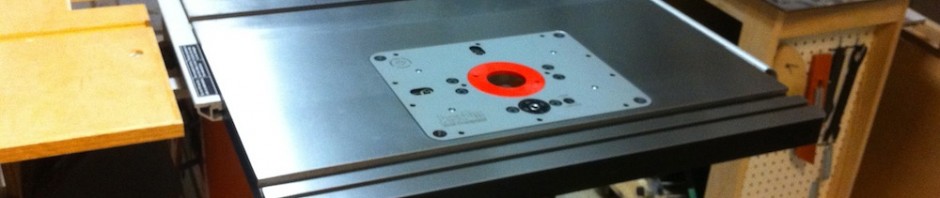
 In the pictures, you can see my new router lift. There was nothing to installing that beyond following the instruction manual. Once I’ve had a chance to use this setup for a couple of projects, I’ll write up a review of both the wing and the lift. My initial impressions are really positive. Doing this has had the desired effect of eliminating my free standing router table. I’ll need to do a little re-arranging to realize all of the benefits of that, including finding a new home for my bits and router bases, but right now, I’m pretty happy.
Update, February 2, 2015: Â I’ve recently added a dust collection box under this router wing to collect dust from under the table in addition to the dust port on my fence.
Comments: 9
[…] etc…) they seemed to cost. When JessEm introduced this low cost lift coincidentally with the cast iron table saw extension wing I wrote about before, I couldn’t resist. Â I bought them at the same time. Installed and […]
I’m done (sans fence)! Thanks again, Derek! Couldn’t have done it without you! :)
Dave.
ping: http://2020heinsite.blogspot.com/2013/02/tablesaw-router-station-build.html
I am looking at purchasing the same cast top and a JessEm lift, did you have to do any modifications to get the lift plate to fit and anchor into the cast top?
The dimensions of the plate opening on the casting and the dimensions of the lift plate are theoretically the same. The first time I installed the JessEm lift, it was quite a snug fit, but it went in. I guess it expanded a little bit after installation, because I took it out of the table for the first time a few weeks ago and it wouldn’t fit back in without being forced, so I took a sanding block to the edge of the lift’s plate to ease the fit – didn’t take much. As for anchoring, the lift plate sits on several grub screws, and I never felt a need to anchor it down beyond gravity and friction. I suppose if you want, you can drill the cast iron and use the countersunk holes at the corners of the plate with a machine screw, nut and fender washer. The casting doesn’t have quite enough metal that I’d consider trying to tap for threads in that spot. Having used this combination for more than a year now, I am still very, very happy.
Thank you for all the information. I ordered mine and will be working on it this weekend.
Hi Derek, thanks for this inspirational and informative post. And, yes, I have a new Excaliber plate siting in my shop… I’m wondering if you dilled holes in the sides of the plate to bolt into the rails or if the end bolts to the table saw were sufficient by themselves?
Cheers
Dustin
Hi Dustin, The fence rail on my Ridgid saw is an aluminum extrusion and it attaches to the cast iron table with a T-slot. I do have a bolt running through the side of the router wing into that T-slot on the front fence rail, but not the back. When I checked it just now though, I found that nut had worked its way loose so it wasn’t supporting anything. I’m no engineer, but the end bolts between the extension wing and the main table of the saw seem to be carrying all the weight fine on mine with no sagging or problems. I added that bolt so that the cast iron would support the fence rail, not so the fence rail would support the cast iron.
It’s worth noting that I don’t make a habit of stacking very heavy things on my table saw or hammering on it, and since the router table is heavier than the original extension wing, I’d be even more hesitant to do so. I pretty much limit the weight I’ll put on it to around 80 pounds.
[…] of the time, when I use my cast iron router wing and my router lift, I use it for work at the edge of a board, and the dust port on my fence works […]
[…] iron router table and a router lift, you will never look back. Â You can check out my article about installing it on my Ridgid Ts-3650 for more information about the router wing itself, and I also have an article about the low-priced […]
Comments are closed.